I love Thomas Keller! When I saw a brine/coating mix at Williams-Sonoma I bought it without a second thought. It made the best fried chicken I have ever had (note: i’ve never actually had the fried chicken at Ad Hoc or Addendum)!!! One day I didn’t have any mix left and Williams-Sonoma was out of stock so I used the official recipe in the Ad Hoc At Home cookbook. Another time I used a version I found online (link). But each time, I’ve made some modifications so it’s time for me to write down what I do!
Here are some tips:
The most important modification is the chicken. His recipe calls for two 3 pound chickens but I only like white meat. So I use 6 pounds of chicken breast. Since I buy chicken from Costco, the chicken breasts are huge and some are very thick! I find it much easier to cook this chicken when the pieces are equal size and not too thick. It’s important that the chicken cooks before the coating overcooks!
His recipe calls for fresh herbs in the brine. If I have the herbs in my garden then I use the fresh ones because they are free! If I happen to go to the grocery store and know I’m making the chicken, I will buy the fresh ones. But usually I’m making the brine at 6am so my grocery store isn’t open for a last minute herb run so I turn to my collection of dried herbs. However, I always use fresh rosemary because that is an herb that is so easy to grow and I always have an abundance on hand. Everyone should have a potted rosemary plant in the backyard!
The brine needs to cool before you can add the chicken because you don’t want to cook the chicken. You can make the brine the night before or early in the morning. Here is my typical timeline of how to make the chicken for a dinner party.
6am – make the brine
8am – add the chicken to the brine and refrigerate
4pm – take the chicken out of the brine and rinse, discard the brine, then let the chicken come to room temperature
5:30pm – coat the chicken
5:45pm – fry the chicken
6pm – dinner is served!
Sometimes we save a few of the brined pieces and grill them since the brine is amazing!
Brine ingredients
1 gallon water
1 cup kosher salt
1/3 cup honey
12 bay leaves
2 tablespoons black peppercorns
3 large rosemary sprigs
1 small bunch of thyme (or approx. 1 tablespoon dried thyme)
1 small bunch of parsley (or approx. 1 tablespoon dried parsley)
1 head of garlic
2 lemons, zest and juice
Brine instructions
1) In a large pot, combine 1 quart water, salt, honey, bay leaves, black peppercorns, rosemary, thyme and parsley.
2) Separate the garlic cloves. Peel off outer layers. Smash garlic cloves and add to pot.
3) Zest the lemons into the pot. Cut and juice the lemons into the pot then add the lemons to the pot.
4) Bring to a simmer over medium heat until the salt is dissolved.
5) Remove from heat and add 3 quarts water to the pot. Note: some of the water can be in the form of ice cubes to speed up the cooling process.
6) Let the brine cool completely before adding chicken.
Preparing the Chicken
1) Cut the chicken breasts into roughly equal size pieces in terms of surface area and thickness. For a Costco chicken breast (not the organic ones which are smaller) I find I get 3 pieces. I cut off one piece from the bottom then slice the remaining piece in half for 3 more equally thick pieces.
2) Divide the chicken equally into 2 gallon size freezer ziplock bags.
3) Use a ladle to fill the ziplock bags with brine. Be sure to divide the garlic, lemon and herb pieces equally between the 2 bags.
4) Seal the bags with as little air as possible. Be sure to seal completely!
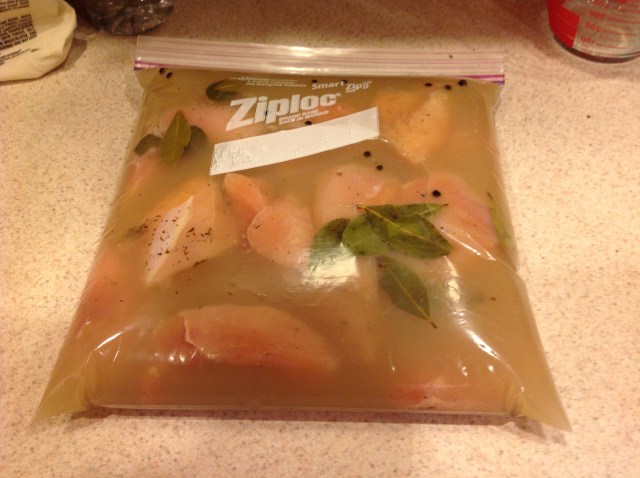
5) Lay the ziplock bags in the refrigerator.
6) Turn the bags once or twice during the brining process to ensure all pieces are bringing equally.
7) After 8 hours, remove the chicken from the brine and discard the brine.
8) Rinse the chicken to remove the herb pieces that will attach themselves to the chicken. Then pat dry with a paper towel.
9) Let the chicken rest and come to room temperature (about 1.5 hours). Note: I’ve skipped this step before when I’m running behind schedule so I’m not sure how important it is.
Coating ingredients
6 cups all-purpose flour
1/4 cup garlic powder
1/4 cup onion powder
1 tablespoon plus 1 teaspoon paprika
1 tablespoon plus 1 teaspoon cayenne
1 tablespoon plus 1 teaspoon kosher salt
3 cups buttermilk
Coating instructions
1) Add all dry ingredients to a gallon size ziplock bag, seal the bag and shake to mix.
2) Divide the dry coating mixture equally into 2 flat trays.
3) Put the buttermilk into a 3rd flat tray.
4) Seat up a dipping station: Chicken, coating, buttermilk, coating, parchment-lined baking sheet.
5) Coat the chicken with the dry mixture, then cover in buttermilk then cover with more dry mixture and transfer to the lined baking sheet.
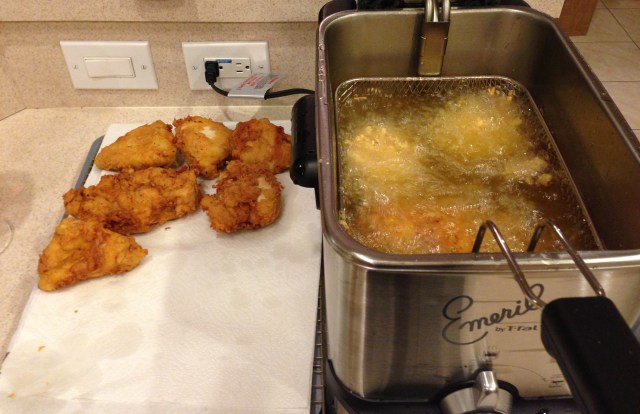
Frying the chicken
Hopefully you own this fryer (link). If not, buy it! I’ve had mine for 5+ years so it is an older model but the design is great!
1) Heat peanut oil to 338F.
2) Add the coated chicken to the basket and lower into the oil.
3) Cook for 5-7 minutes. If you have cut the chicken to the appropriate thickness the coating will be golden brown indicating it is ready.
4) Remove from oil and let rest for 5 minutes on a drying rack on a baking sheet.
5) Transfer chicken to a serving bowl and store in a warm dry place for a few minutes while frying the remaining chicken. (Note: I use the microwave as my storage facility.)
Last step = enjoy!!!
We typically serve with the following side items:
Manchego mashed potatoes
Steamed asparagus
Mac n cheese
Creamed corn
